This trash cleaning will clean your drain in no time

Key points

  • Use baking soda, vinegar, hot water, ice and citrus for cleaning and deodorization of your garbage.
  • Avoid sharp chemicals; Use cold water, salt or snake for drain for hard clogs.
  • Don’t pour fat or oil; Clean regularly to prevent accumulation.

If you have lucky enough to have a sink with garbage disposal, you know how useful it can be during everyday cleaning. However, if you are disposing of garbage in a rough shape and needs to be cleaned and revived, you may be wondering what further. It said, don’t be so fast to run into a store looking for a solution.

“Defending garbage is often overlooked when it comes to routine cleaning, but with a real DIY approach, they are actually very easy to maintain,” says Jared Sarbit, General Manager Image Perfect Cleaning.

It is more than likely to have all the materials you need to fix this problem abolishes into your pantry. Here cleaning experts outline the process involved in cleaning your garbage disposal using basic bases and also divide what to avoid to ensure that your drain is clear in the future.

Materials

  • Baking soda
  • Vinegar
  • Hot water
  • Citrus peels and ice (optional)
  • Measuring glasses

Want more cleaning and organizing advice? Sign up for our free daily newsletter for the latest hacks, professional advice and more!

How to use DIY garbage disposal

Below is a five-step process based on the advantage of the cleansing, which we have interviewed, which describes the best way to use your DIY for disposing of the trash for successful outcome.

  1. Prepare baking soda. Recharge the measuring glass with 1/2 cup of bicarbon soda and pour it available.
  2. Prepare your vinegar. Complete the measurement glass with a cup of vinegar and pour that over the baking soda, which will result in a physis noise, explains Scott Schrader, cleaning expert in Cottegecare. “This chemical reaction breaks fat and grime,” he says.
  3. Allow the mixture to react. This process will last about 10 to 15 minutes.
  4. Wait for the fizz stop. When fizzys, slowly pour three cups of hot water down the drain.
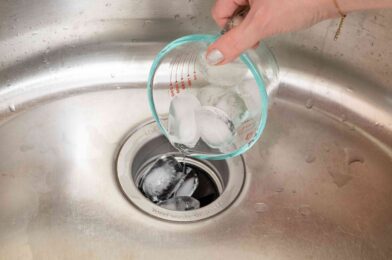
  5. Consider adding ice cubes and citrus peeling. Once you finish this procedure, you can run some ice cubes together with lemon or orange crust through garbage disposal; Schrader notes that this is an effective way to remove residues from the blades, and at the same time you get rid of any unpleasant odors from the procedure.

Drain cleaning tips

Credit:

-Oxford- / Getty Images


Cleaning experts we talked with offer several tried and true tips for keeping drains at all times. Triguling to facilitate your drains with the daily attention and day in exit, they will prevent you from dealing with heavy tanges down the road.

  • DIY when you can. Not only is it easy to buy a pantry, but it’s better for your drain. Schrader recommends using a DIY mixture that is highlighted above, unlike spilling sharp products of purchased chemicals down the drain, because they can ultimately damage your sinkpiece.
  • Run cold water. To prevent damage in the future, Schrader suggests that cold water flow during and after the use of disposal, as this will help completely resolve food particles.
  • If necessary, use salt. If you are engaged in the main accumulation in garbage disposal, salt can help. Schrader advises a mixing of half a cup of salt with your half cup of baking soda, and then adding vinegar and hot water to the above.
  • Try a snake to help you in difficult situations. You can also try to use small clip or snakes in the sink to help with Tougher Cogs, Sarbit adds. It recommends that this follow the following baking soda and acetic reaction and believes that this is an effective alternative to using sharp chemicals.
  • Don’t pour certain liquids. Your garbage is not equipped to handle all types of liquids. For example, you should not pour fat or oils down; It is often the main source of accumulation, sarbital explains.

How often do you need to wash towels in the summer? Painary Pro Weigh In

Key points

  • In summer, towels should be excluded every 2-3 days and wash out per week.
  • Humidity in the air keeps towels from drying completely, which could lead to odors.
  • Keep towels in airy containers and ensure that they are completely dry to keep them getting out.

Everything is dirty in summer: temperature and moisture guarantee that everything that sweat can be sweated. The last thing you want at that time of year is to dry freshly cleaned hands, face or whole body on a dirty towel – do you realize that it is dirty or not.

We talked to a group of laundry that pointed us how often we need to follow towels in the summer, and the spoiler: That’s a lot more than you think.

Meet the expert

Nia Thomas is the co-owner of Laverie Laundromat in New York.

How often do you need to wash towels in the summer?

Generally, you should follow towels per week. If you do this less often, but behind in particular In summer.

“During the flight that changes. Ideal, towels should be changed every 2-3 days,” says the artificial washing Nia Thomas.

Depending on where and how often use towels, this time line will vary. Here’s how often Thomas says to wash different types of towels:

  • Face towels It should be followed every day, especially for people with sensitive skin. “You can operate them immediately after use, tighten the stock that will take you through the week or use environmentally available disposable towels,” Thomas says.
  • Hand towels It should be washed every 2-3 days, especially when used repeatedly several times a day by more people.
  • Bath towels It should be washed every 2-3 days in the summer.
  • Beach towels should be washed after each use, but with a little more attention. “Always shake the sand before washing, and if they are exposed to salty water or pool chlorine, run them through a rinsing cycle before adding a detergent to avoid building or faded,” Thomas says.

Want more cleaning and organizing advice? Sign up for our free daily newsletter for the latest hacks, professional advice and more!

Why does the summer make a difference?

Thomas mentions that you can continue feathering per week until the towels are completely dry before they are placed in the brake. This component is crucial because the moisture that keeps your towels that are as cleaner.

“The key culprit is not just a sweat that often leads to more showers and use of a towel, it is moisture,” Thomas says. “Increased moisture in the air means towels dry slower, creating a perfect environment for bacteria and mold to progress.”

How to keep towels from becoming milk

Near towels that are often accompanied, you are risking to become covering. But sometimes, even with consistent washing and care are still developing that acidic scent. Here are a few ways in which Thomas suggests you can keep that from happening:

  • “Check that the towels are 100% dry before assembling or storage; even a small moisture can lead to the fold,” she says.
  • When storing a towel, add a dryer, block cedar or lavender bag and baking soda to mitigate excess moisture and odor.
  • Instead of sealed plastic buckets, decide to store towels in more flexible, airy vessels.

Now is the best time to circumcise citrus tree for even more fruit – here

Key points

  • Trim dead, damaged or crowded branches to strengthen fruit quality and keep trees neatly.
  • The condition of the canopy and the reduction in height improves sun exposure, airflow and ease of care.
  • Regular circumcision supports healthier growth, less pests and better, more productive trees.

If you have a climate for growing orange trees or other compact citrus varieties in your backyard, you can enjoy the abundance of great green leaves, fragrant flowers and juicy, fresh fruit.

Evergreen Citrus tree with strong branches do not require the type of intensive cropping of fruit deciduous trees. However, you will still need to build crops to prevent irregular growth and excessively thick canopy.

Follow this guide to learn how to cut citrus tree to promote healthy fragrant frags and a tidy look.

How to Delete Citrus Trees

Before you start, grab sterilized secersets or hand holes, large branches and trimming saws. You may also need an orchard to reach a canopy if your trees are high.

Remove the branches to maintain

Eliminate dead, dying, damaged, colored, cross, diseases or pests branches from young and mature citrus trees. This origin of the layout of trees and directs all energy on the healthiest growth.

Remove small branches to handmishes, secers or lopari. You may need to use a saw tree to remove a larger branch. Citrus trees are thin, easily damaged crusts, and carefully equip; Target the blade towards the tree for clean cut and cut on the collar (shoulder between branch and trunk).

For large, heavy branches in diameter over 1.5 inches, create a three-part cut as follows:

  • Choose a place from 6 to 12 inches from the collar and saw through a 1/3 branch of the underside. This subcutor prevents branch weight from causing tears in the bark or damage to branches below.
  • The next cut should start at the top of the branch about 3 inches from trimmed. Cut from top to bottom while two cuts not happy and branches do not fall.
  • Cut the remaining slave back in the branch.

Want more darts tips? Sign up for our free newsletter for our best growing tips, troubleshooting and more!

Thin trees canopy

Recording an overly dense citrus tree canopy every few years helps ensure the size of sunlight down to the lower fruit. You want sunlight to hit the country under the canopy at noon to produce the strongest and state-of-the-art fruit.

To achieve this, you strategically remove some larger branches of the center (using a three-piece cutting method) to enable more light.

Do this gradually, estimating the lid of the sun after cutting each branch. Excessive dilution can lead to burns from other branches.

Arms to reduce tree height

Measuring mature citrus trees less than 8 feet makes broil control, trimming and other maintenance tasks easier and safer. Avoid cutting more than a third of the height of the trees, because excessive circumcision can affect its energetism.

Skiing of upper growth high, spindle young trees helps promote lower, fuller canopies.

Focus on cracking downwards, as this promotes the development of buds that grow upwards that you want for healthy fruit production.

Skirts Your citrus wood

If your citrus tree has small height skirts that touch or lags near the ground, removing them up to 18 to 24 inches above the country every two years can be useful.

It helps in aesthetics, prevents pathogens that are carried by the soil of contaminated fruits and allows easier access to the roots and feeding ground. It is especially useful for satsume mandarins, which have a particularly low hanging branches.

Protect exposed wood

If parts of a bare boot or citrus branch exposed to intense direct sunlight after circumcision, the painting of exposed wood helps protect from the sun, which can damage damage and burst damage.

Reach exposed wood with wooden color or white rinsing one side of latex color in one part of the water. Avoid oil based colors.

When to crop citrus

It is best to remove dead, dying, damaged, colors, crossing, illness or pested branches as soon as you see them until it is a season frost.

For other circumcision, wait for intensive summer heat and before the spring is changed; Otherwise, this can cause problems with SAP ongoing.

Never defore citrus trees when there is a risk of frost. Early cropping falls mainly is not recommended, as all new prospects can be damaged by winter frost.

How often you shaped the citrus tree depends on the species, cultivars and local conditions. The lemon and other fast growing citrus species are easy a year are often the best. Others cannot require circumcision (other than removing dead or damaged branches) more than every few years.

However, the longer citrus tree goes between circumcision, it will need more intensive dilution, and larger branches can be physically challenging to remove.

4 Other Citrus Trimming Tips

Below are some extra useful citrus trimming tips to keep in mind.

  • Klips or plant honey are energetic, vegetative, upright stems that grow out of trunk, outside branches and from roots. Remove these green and easy tape manually when small, because they use a lot of water and nutrients, and the fruit they produce are not delicious.
  • If your citrus tree has a heavy harvest of fruit for a year, and the light of vintage next, this is called an alternative bed. Difficult pruning after the light year is useful. This reduces fruit wood and allows wood to build their reserves for making more balanced fruit habits.
  • If you plant a number of compact trees to close your privacy protection, you can use electrical protective protection to make them rise and enable light to the inside of the hedge, resulting in greater fruit production.
  • When you cut off large, mature branches and the diameter of the wounds are great, consider using copper spray spray. This minimizes the risk of developing infections such as Citrus Canker.

How to support your child in choosing the right sport for them

Choosing the right sport can be a defined moment in the child’s life. It is more than just after school activity – the real sport can build trust, promote fitness, teach discipline and a foster friendship. As a parent, your support plays a key role in helping your child discover the sport they love. Here’s how to run your child through the decision-making process without irresistible or pressing them.

1. Follow their interests and natural abilities

Start by addressing attention to what your child is naturally pulled out. Do they like to run around, hitting the ball or climbing things? Do they keep dancing around the house or fascinated Swimming pools? These little clues can point out the sport such as football, gymnastics or swimming.

Every child is different. Some are team-oriented, while others enjoy the solo challenges itself. If your child enjoys group games and work together, team sports like basketball or baseball can be a great fit. If they prefer focusing on personal improvement, try a song and field, martial arts or tennis.

2. Let them try various activities

Before contacting a single sport, may your child explore different options. Many community and school centers offer trials or short-term classes. Encourage your child to try multiple sports over time. Think about it as sampling with buffet before choosing a favorite meal.

This exposure can help them find what excites them the most. Sometimes children can surprise you – a quiet child can love karate or hyperactive can find focus in archery. You can even discover an interest in something unconventional, as Scateboarding lessonsthat combine physical challenge, creativity and independence.

3. Talk open about your feelings

Communication is crucial. Sit down with your child and ask them how they feel about the sports they have tried. What did they enjoy? What didn’t they like? Was the coach useful? Were they comfortable with pace and surroundings?

Keep the light of conversation and open. Your goal is to understand their preferences and level of comfort rather than manage them in any specific direction. Use phrases like “What was the most fun part?” Or “there is something you would like to try instead?” to encourage honesty without pressure.

4. Focus on fun and learning – don’t win

One of the biggest mistakes of parents can make emphasizes performance over enjoyment. When children feel like victory is the only thing that matters, I can quickly lose interest or develop anxiety around sports.

Instead, help them see the value in effort, teamwork, learning new skills and entertaining. Compliment progress rather than just results. Celebrate small victories – like learning how to dribble, making a new friend in the team or is constantly displaying for exercise.

5. Support their schedule and liability level

Different sports come with different requirements. Some require intensive training and travel, while others are more relaxed. Talk to your child (and think about the availability of your family) how much time and energy are willing to commit.

If your child is younger or new in organized sports, it is best to start with something that doesn’t feel irresistible. Overload with long practices and competitions can immediately lead to combustion. As they grow, they can naturally want to take over more responsibilities and training.

6. Set realistic expectations

It is natural to want your child to succeed, but it is important to set up expectations based on their age, personality and goals. Not every child will become a professional athlete – and that’s fine. Your focus should be on growth and not perfection.

Let your child know that it is quite fine to switch sports if something doesn’t feel good. Children change, including their interests. What is important is to remain active, enjoy what they do and feel supported on the trip.

7. Be their biggest fan – not their coach

Unless you are a trained professional in sports, your child chooses, avoid taking the role of the trainer. Instead, be their biggest cheerleader. Encourage them from the side, help them exercise if they ask and be there to offer support when they need it.

Criticizing their mistakes or predominant games can lead to pressure and indignation. Your job is raising and persuasion. Ask them if they had fun, not just how they did.

8. Look for the right environment

The coach, teammates and the total atmosphere can significantly affect your child’s experience. If your child feels uncomfortable or unsupported may not be the right environment – even if it is a “real” sport.

Look for programs in which coaching philosophy emphasizes encouragement, effort and development. Talk to other parents, observe a few practices and do not hesitate to switch programs if it is not properly appropriate.

9. Encourage balanced lifestyle

Finally, help your child understand that sports are part of a balanced way of life. Encourage them to rest, eat well, spend time with friends and focus on school work. The sport should improve your life, not consuming it completely.

If your child jugglings too much activity, help them priorities. Being involved in a single sport that truly enjoy is better than to extend thin over a few, they feel obliged.

Help your child choose the right sport is not in finding the “best” or the most popular option – it is supported by their research, growth and joy. Be patient, stay flexible and celebrate their journey, whether to lead to a football field, a rink or something completely unexpected.

Your support and understanding will do all the differences. When children feel empowered to make their choices their choices, they are far more likely to remain active, confident and happy in their selected path.

The best top of the home style I’ve ever transformed my space completely

As an interior design writer and trends, I constantly investigate the best home design and shaping tips. I am also happy enough to talk to some of the best interior designers in the game and see some really beautiful spaces.

However, when it comes to my home, I fought to find my style and bring him to life. I kept chasing the moment I’d finish the space and felt like I’d really scored ga-Too successful, I will notice.

It is until I have received a simple friend advice that transformed my approach to decorating home.

She said wisely: Finding your interior design style takes time; Trust the process and enjoy the trip.

Pressure to get it for the first time ”

For some idea that they will find their design style need time (and exercise) can seem obvious. That’s just like anything else, isn’t it? Practice makes perfect or something closely.

However, for chronic pesders of perfection like me, this idea is not intuitive, and that can be quite deep.

Ask any interior design Pro, and they made their right share of design mistakes over the years. How to learn and grow.

In the end, it is important to not allow fear that you will stop you “wrong” choice to start traveling to the shaping of the space you truly love. They’re big chances, you won’t get “right” for the first time and that’s okay.

Do you want more design inspiration? Sign up for our free daily newsletter for the latest decorable ideas, design advice and more!

Why a rushing process is rarely working

This min mandate helped me in several ways. First I stopped criticizing myself for “mistakes” in my past; Instead, I can admit that they crossed stones to help me bring me closer to the home that really feels authentic.

For example, about five years ago, my husband and I finished the great reconstruction of the primary bedroom in our new home. At that time, I was relatively new in the world of interior design, and I had no idea what I liked or what I wanted. The modern village house for the farm house was in Trend, and I liked the way they looked, so I decided to rely strongly in that aesthetics.

I liked to install bold black accents, which led to the decision to paint black emphasis in our bedroom, install Matte Black Hotels everywhere and upgrade hardware.

I held the walls with a sharp white, and we set up warm laminate nuts to add some warmth. Admittedly, the decision was a bit impulsive and lacked detailed research.

Today, Irk-in-room design is, and I am already being prepared to take full refresh (much on the disposal of my husband). Menu, space is lacking warmth and character, and the worst of all, does not match the rest of our home or its architectural details.

I’ve learned since then I don’t like a modern farmhouse so much for my home! Frustrating? Yes. But the necessary growing pain, and a heavy lesson learned: take time, and don’t rush in style you are not 100% sure about it just because it’s a trend.

Learning to live in “Between”

Taking time to find your design style means that your home can be figuratively stuck in Limbo for a while. This idea was painful to me in the beginning, but in reality there is flexibility and joy in acceptance “between”.

You can experiment, you really think that things before you commit, ask friends and family for advice and replace things as needed. Shales of perfection: Don’t be afraid of each other, there can be a surprising release if you let him go.

What I would say to all just began to design space

If you feel a flooded idea to find your home design style I was there. My biggest getting from my friend’s advice was literally slow down the process.

For example, if I plan to rewrite the room, I will really take your time by choosing colors. I left on the walls on the walls on the walls for a few weeks before I decide on the shade – something I would never do before.

I will also probably test a piece of decor in the room and remove it if it just doesn’t work. Your decorations decor should not be final on the first attempt.

Finally, I removed the pressure to finish things quickly and I spent more research times, looking for inspiring photos and visualize how I want my space to look.

Taking time to talk to friends and family can be useful. I can surprise you with a tips or hard-learned lesson to help you in the long run.

In the end, creating the home you love, it is not about being perfect – it is about release to grow with you, with one thoughtful, imperfect and authentic step at once. So, from one rookie design to another, to assure you: the finding of your design style takes time, so trust the process and enjoy the way.

Our editors never sleep without these 6 attempts and true comforts (and you should not)

We all have our daily routine, whether they include go to the gym, stopping in grocery store, or even do the final change clean before bed. On spruce, our editors are not an exception. If we saw at night, we all have certainly if we just can’t sleep.

We asked our editors to share some of the negotiations that swear for a good night – and maybe you would like to wish me and try.

LaVanda Room or Cotton Fragrant / Bedding

Credit:

Adene Sanchez / Getty Images


“I don’t like anything more than the smell of all home and my bedroom – especially with a cat, a quiet scented and cotton scented room / bedding smells so beautiful and lovely, I can’t sleep anybody these days.” – Rodriguez, editor.

Do you want more design inspiration? Sign up for our free daily newsletter for the latest decorable ideas, design advice and more!

Nod

Credit:

Lamina Aklova / Getty Images


“As I live in New York for eight years, I have entered the habit of all by nervous fireworks in Canada, but I am impossible to sleep without them. On longer rubber tires, which are so much more pleasant for me and they never ears me. “-Kate McKenna, extraordinary directorial director

Additional pillows

Credit:

Katarzynabialasiewicz / Getty Images


“I used to take” less more “access to my pillows – two on the bed while I sleep, Maximum. I would sleep fackiedown and I would wake up with a multitude of problems. Since I started sleeping on my back and aside, I was obsessed with an extra pillow or two in a pillow between my arms and / or leg. Now I have one head pillow, one for my legs, one to keep and four, because the number of pillows on the bed is uneven. Besides, sometimes my cat uses it. “-Natalia Gonzalez Blanco Serrano, Coaching Editor

Additional fluffy duvet

Credit:

Jela / Jakov fox


“Even in the middle of the summer I have to make sure I have a bedding. Nothing says bed linen in a hotel like a big, fluttering covers. Besides, it can’t be easier to make a bed every morning.” –Caroline UTZ, Senior Director of Editorial and Strategies

Weighted eye mask

Credit:

Darren Lehane / Getty Images


“To whom should the curtains if you have a weighted eye mask? My favorite one sunlight and applies enough slight pressure to fall asleep, I don’t throw into light. –Sara Brown, Editor of Social Media

Perfect Jorgan

Credit:

Spruce


“For six warmer months of the year, the best thing in my bed is my quilt. Something that is 100% cotton with cotton filling, and the exact perfect weight. I feel so comfortable under that, but never also Warm. Whenever I go on vacation, in the end I think about my cover and how much I miss. In addition, a good covering only makes the bed look so composed. “-Jenny Hughes, Extraordinary Director Director

What to do if you have forgotten to cut butterfly bush (not too late!)

Key points

  • Spring is the best time to shape a bush butterfly. Crop in late autumn or winter leave them subject to freezing damage.
  • Wait until spring to make a hard gravel (it is crumpled back to one leg).
  • Light pruning and dead ends in summer and fall are fine.

Repairing your butterfly shrubs is one of these necessary but easily forgotten jobs. Fear of that wrong, plus the busy nature of life, is a formula for the overgrown butfly shrub that does not bloom well.

The good news is that if it’s too late to cut the butterfly Bush this year, there is a very good chance that it is not too far. Here are the best actions that will ensure that your Butterfly Bush produces plenty of blooms next summer and fall.

Why is the cropping windows missing

Credit:

Sandra Sotbridge / Getty Images


The best time of year for hard food is in early spring, but after the final frost. When you reduce the butterfly bushes, temporarily expose their hollow stems. The stems will take water, which is not a problem if the temperature remains above freezing. But if water freezes inside the stems, they will probably be divided.

In addition, pruning in the spring is best because it blooms in the form of new growth. You will be able to perceive a new growth of butterfly Bush new foliage.

Want more darts tips? Sign up for our free kindergartens Bulletin for our best tips for breeding, troubleshooting and more!

3 steps to download if you missed the crop window

Credit:

Sue Zellers / Getty Images


If you missed a hard crop window in the spring, here’s what to do:

  • Deadhead has spent the flowers: While your butterfly bush blooms during the summer and falls, remove spent blooms to encourage even floring and prevent the spread of seeds.
  • Do easy cropping before the chance of the frost: Although it is best to avoid bush benching out of spring, you can slightly cut a few inches from its stalks if you fall into your other plants. Never peel butterfly bush if there is a chance for frost within 48 hours.
  • Wait: Resist the urge to make a hard gravel before next spring. You can do more harm than good if you shaped at the wrong time.

3 characters your butterfly shrub can refuse

If you missed the ideal crop window for your butterfly bush (even a few years in a row), don’t dig it yet. Here are some signs that you can revive, Spring:

  • There is a lot of new growth in the database: Because blossoms are a form on new growth, it is a good sign if you notice a lot of new growth that appears near Bush’s roots.
  • It’s not Legglo: If your butterfly shrub is overgrown, but still lush and thick, it is a good sign to receive the right conditions for growth compact, but more contained.
  • On the face is on the spot that receives enough sunlight: If your butterfly bush is on the spot that receives eight hours of a bright sun, there is a good chance that they will not grow leggie.

How to properly peel off the next spring

As a general rule, cut off butterfly bush to be around one leg in the spring, but don’t pass new forming buds. This is called hard gravel.

Hard gravel is different from the lighting. The heavy plate is more drastic and involves cutting bush as closely as possible. Light cropping (removal of just a few inches stalks) is OK in early fall and actually can be prevented from getting to your butterfly bush from sowing and spreading too much.

FAQ

  • You should not peel butter shrub in late autumn or early winter. When you root a butterfly shrub, water can enter the hollow stems and freeze when the temperature falls. This can cause branches to separate. However, the trimming of light in early autumn is fine.

  • Should reduce the butterfly bush to about one leg tall in the spring. It will promote new growth of shrubs, which means more flourishing.

  • Skipping of circumcision leads to a smaller bloom next year because the flowers appear on the new growth.

How to use this ingredient 3-ingredient as a DIY Koria killer who really works

Key points

  • Weed control can be performed without the use of poisonous commercial herbicides using a simple DIY weed mix.
  • This killer weed is made with basic white vinegar, salt desktop salt and dishwasher.
  • Time and application should be done with care to improve the efficiency of this formula.

Although there are many herbicides in the market, many gardeners prefer to use non-toxic weed kill formulas, and even create effective weed killers of domestic weeds that are easy and cheap to make.

It is an attempted and true three-part formula, including soap, salt and vinegar, well known among the gardeners who have successfully used it. We also collected some tips on additional natural weed control methods in your garden.

Meet the expert

  • Linda Pereira is a professional gardener and a garden designer living and working in Boston area.
  • Connette Hird is an experienced gardener and writer specializing in gardening for easily urban gardens.

How are the three ingredients of Korova Korova

The three ingredients in this formula (salt, soap and vinegar) can be effective alone, but together they create a more powerful weed killer. Ortåer is crucial because his intense acidity has the possibility of killing weeds almost immediately. Ortće, also known as acetic acid, can crack herbal cells, which cause them immediately to dry and die. This process is known as a scam, and the vinegar is known as Dessictan for this reason.

Experts at the Montana State University say that vinegar is also a non-listing weed killer, so it should be used in areas where weeds grow among desirable plants.

Antiseptic properties of soap can kill bacteria and other germs, such as viruses and fungi, and this further violates the growth of weeds disturbing the biological balance of the soil. Soap also helps in this weird killer to adhere to plant leaves and stalks by forming sticky films with other ingredients, which allows him to fully penetrate herbal cell walls.

Salt, such as vinegar, also disrupts the growth of plant cells and dried herbal tissues. Salt can also change the soil composition, which affect its nutrition and water, so it should be used independently as the weeds of the killer.

Want more darts tips? Sign up for our free newsletter for our best growing tips, troubleshooting and more!

When and how to use the weeds killer

The time is an important aspect of using any weed method, including the domestic weed kill formula. Montana State University says that the killers with vinegar are most effective and younger weeds most effective and younger. Using this formula in the spring and early summer, as the weeds began to appear, it is a good way to maximize its influence.

If you have a big, mature weed, try to cut out the vertices, which makes the roots a little vulnerable. Then use your vinegar formula to kill the plant: This method can increase its efficiency.

Some gardeners use horticultural vinegar for weeds. This concentrated substance should be used with caution. Most horticultural vineys contain a solution of 10-20% acetic acid (compared to 5% in house acean), and some formulas are available in higher concentrations.

Linda Pereira, a professional gardener and garden designer, says it is important to be aware of the chemistry involved in the use of horticultural vinegar, and a potential impact on the surface of the soil and the adjacent surface such as paved parts or pavers.

How to make three ingredients Korov Korov

This homeland formula weed killer is very simple in a few months, if kept in a cool, dry place. Here’s how to make:

  1. Collect ingredients and supplies. You will need a white vinegar, basic table salt and liquid dish soap (dawn blue dishwasher is good basic). You will also need a container to mix it and a container to release it. (Please note that sprinkling dispersi is easiest to use, you can pour it directly to roots and small weeds.)
  2. Mix the ingredients. Add ingredients in a large bowl or spoon. The standard recipe for this formula is a gallon of white vinegar to one cup of salt and one tablespoon of eating soap. You can also double or halve the recipe as needed.
  3. Ship to a sprayer or jar for use. The glass spray bottle is the best, but plastic works in the row. You can also store unused parts in glass jar over winter indoors.

How to increase efficiency

  • The murderers based on vinegar are most effective when used on weeds that are younger and smaller in size, and this is not yet established root systems.
  • If you use this weed killer on large weeds, try to first cut the above growth in order to concentrate its efficiency near the roots, and also reduces the need to use as much of that.

Long-term weed management tips

Some weeds are harder to eradicate from others, and there are different reasons for that. Some weeds simply have very aggressive growth tendencies. Also, if you miss the drawing of a piece of roots, they can regenerate, and some weed will be solved. Using this simple weed killer will definitely help you control weeds, but we have several advice for experts for other non-toxic approaches in weed control

Annette Hird, an experienced gardener and a writer specializing in horticulture for easy urban gardens, says perseverance is key when you fight weeds, and it is crucial to remove all roots.

Suggests that if you continue as soon as possible to appear new weeds, in the end you will find that the area you are trying to clean. Shird also recommends rooting immediately after it rains when the soil is humid, which makes it much easier to pull them away, and causing natural mulches like false leaves and prevent weed growth.

For tricky spots like stone trails or finishers, Pereira used the weeds of torch with some success. Some gardeners also use boiling water to kill weeds in such difficult areas.

6 Home characteristics people are mostly regret, according to designers

It is common to impulsively buy a piece of furniture or decide to achieve a pain only for refreshing space, however, there are several home features.

We asked the interior designers to pour the truth about the greatest home design sorry for seeing – and trusting us, they are no Hold on. From the wrong counter move on the regret of a plumbing match, here are what they said (and how to avoid making the same mistakes).

Meet the expert

  • Paulina National Is the interior designer in Yeah! Ntereoors.
  • Kerry O’Duibhir is the Chief Executive Director in Novi Wave design and contracting.
  • Alexieshies Is the owner and creative director in Adelyn Charles Interios.

Angular sinks

At first glance, an angular sink may look like a smart way to save space, especially in smaller cuisines in which each inch is counted. But according to designers, this choice looks often ends high on the client regret list.

“One choice of designs that I often see clients with regret is an angry sink,” says Paulina Hospod, interior designer on Yeah! Nterioni.

Although they initially look like a space to save space, she says, come with a few shortcomings: one, they are embarrassed to stand in front of any time. Two, they sacrifice valuable storage with an angle plumbing cabinet. And, three, push the sink too far back into the counter, making it awkward to use.

If you are renewed or build from zero, the Hospod recommends that it sticks with the central sink location whenever possible. It could stop a little more wall space, but your back and storage options will thank you later.

Do you want more design inspiration? Sign up for our free daily newsletter for the latest decorable ideas, design advice and more!

Black plumbing nodes

Credit:

Sabina Galja / Getty Images


They may look elegant and dramatically on Pinterest, but according to designers, after entering real life sets, black waterlocks often leave home owners with more regrets from fire.

“I saw so many customers to choose after they start living in photos, the fact that the manufacturer’s warranty,” said a strong manufacturer’s guarantee, “said a strong manufacturer’s guarantee,” says is a strong manufacturer’s warranty, “he says.

Instead of black nodes, the guest encourages clients to hold timeless finishes such as chrome, nickel or brass. They not only grace, guest says, but they are easier to maintain – and far more likely to withstand the test of time, both functionally and aesthetic.

Loop

Credit:

Shae M / Getty Images


It’s comfortable, it’s textured, and the whole is your Instagram Feed – but according to the interior designers, Bouclé may be better admired than he lived nearby.

“Bouclé is one fabric that often cautious clients,” Hospod says. “Although it is nice photographing and adds a great texture, in everyday use, Tendense is disappointed.”

Rough and dust can specify deep in the loop, it explains, which makes it difficult to clean, and the fabric is uneven tones of brighter tones, and the floor bottles quickly wear out, while darker emphasize every stain.

If you love the textural look of the Boucle, but you want something more practical, consider similar textured fabrics with firmer weaving or performance endurance.

“Everything is in finding a cute point between style and sustainability – for your furniture and Your reason, “says Hospod.

Lower cabinets without extraction shelves

Traditional lower cabinets may look timeless, but when it comes to daily function, they often fall short. In fact, if you ever had to crash and dig through the dark corner to find Blender, you already know the fight.

Many people choose traditional lower cabinets with shelves, which look classic, but make up back and dig back for heavy containers, bowls and small devices, Kerry O’Duibhir, on the main executive director on new wave design and contracting.

After using the kitchen for a while, customers often realize deep drawers or extras are far more functional – you can see all at first sight and can easily see it and easily achieve it.

O’Duibhir recommends reviewing a lower wardrobe warehouse early in your planning process. Opt for full extension trays or extraction shelves to make each inch usable and your kitchen is much easier.

Marble seals

Credit:

Brimaker / Getty Images


There are no denial marble slabs amazing. Elegant, timeless and oh-Fotogenic. But ask everyone who lived with them for more than a week, and the love affair begins quickly to suffer quickly.

“Marble seals! I love the look of marble as much as the next girl but simply not a practical solution in the kitchen”

Alexa, owner and creative director in Adelyn Charles Interios, explains how marble is not a practical solution in the kitchen because it requires regular maintenance because it is super soft and porous.

“He prone to chopping, scratches and staining, and if you live in a house with a kitchen that actually gets used to it, it will never last,” he says.

Even spraying lemon juice or wine glass can leave a permanent label, and the storage of marble often requires a precautionary level that the most interesting households do not have time for.

Thies recommends quartite as a Savvy alternative.

“It is a natural stone that has a similar movement and coloring marble, but with durable durable,” she explains. “You will still get that soft, organic look – but without worry every time someone puts coffee.”

Luxury laminate

Credit:

Kseniya Ovchinnikova / Getty Images


Luxury vinyl or laminate wooden floors is another thing that the link is highly recommended to customers to be further away. Although it can initially be attributed to its resistance and appearance of a wooden floor, they will never beat the right thing, we explain.

Among the greatest complaints of clients? That unmistakable “clicky” sound under your feet, a synthetic feeling that does not grow graceful and lack of warmth and character that naturally leads into space. It can be held against spills, but it falls on the soul.

Instead, Thies recommends designed wooden floors in cordial species such as white oak.

“Nothing beats the warmth of the true wooden floor under a leg,” she says. “Choose the character class option if you want something you forgive.”

Hardened types of wood can be surprisingly easy maintenance and cleaning, she says.

How to get rid of Centiped in your home like a professional

Key writing

  • Centipedes usually enter homes in search of their prey, which includes ants, spiders and dolls.
  • Stonipeds are specially drawn into dark, wet spaces such as a bathroom and basement.
  • To keep centipered in the bay, it is important to treat other pest problems, devastating your space and sealing cracks.

CENTIPERED are one of the smaller smaller insects. But when one (or several) appears in your home, it can still be astonishing vision. While the weather warms up, you may start noticing more undesirable centipeds in the residence in the residence.

But what exactly is attracted to them indoors? And how can you stop them to make your home their home? We included a grease for damage to pests for their insight Tue why centsipedzi appear in your space and prevent them from coming once and for all.

Meet the expert

  • Chris Bagnara It is a cooperative certified entomologist and service director in everything that you need pest control.
  • Allan Bossel Is the licensed extermator and an expert on operations on concrete extermination of errors.

4 reasons Stoniped enters your home

  • They are looking for food: Stotipedes are predominant and often follow other insects such as spiders, ants, silver fish and joke. “So, if these insects are present (in your home), the centiped would soon continue,” says Entomolog Kris Bagnara.
  • Humidity attracts them: Centsiped like humid areas, such as bathrooms, kitchen and basement. “They (are) attracted wet internal spaces because these spaces attract their prey,” explains the licensed exterminator Allan Bossel.
  • They were drawn into dark spaces: According to Bagnari, you will probably find hundreds charged in dark nodes and codes around the house because they are night creatures and are sensitive to light.
  • Bad weather keeps them in: “Certain weather conditions – like a strong rain storm, a cold front or hot spell – I can force (centipered) to move from within when they escape the adverse time,” Bagnara says.

Want more cleaning and organizing advice? Sign up for our free daily newsletter for the latest hacks, professional advice and more!

4 characters you can have a problem with the centitech

Credit:

Fell / Madelyn Goodnight


  • See more centipeds than usual: This point can look obvious, but it is the best indicator of potential issues. “If you see a bunch of centipedas in your house, you may have a hundred time,” Bossel says.
  • There are Centipede State About: Stotipedes often leave behind molitas, which are exoskels that spilled as they grow. “They are transparent and look like a boring, lifeless version of the centipede,” Bossel Elaborate. “If you see Molt, it means they grow and probably find a source of food in your home. Watch out for another error activity and fight this population.”
  • Stonipedes group together: “If (see) several focused in one place, it could be a sign that they found food or pleasant haven in your home”, Notes of Bagnara.
  • There are other pest problems: If there is a lot of ants, cockroaches or spiders inside your home, it can be a sign that intipers are also nearby.

Advice

Seeing one-or even a few centipeds – not usually the immediate reason for worry.

“Some older homes can have an unusual cents in the basement or something, but it doesn’t necessarily mean you have a contagion,” Bossel says.

How to keep Centipedettes from your home

Experts agree that the best way to maintain centipedates in the bay, first get rid of their prey.

“Maintaining a home pest (is) one of the most efficient deterrents, as you would effectively remove the food source,” explains the Bagnara.

The best way to prevent other problems with mistakes is that your space remains clean from mess, crumbly food and general mess. Sealing cracks and cracks near Windows or input points that can lead to home can further help keep centiped and their prey.

Reducing moisture around the house is also key, so the centipedia is not lured by these environments.

“Use the dehumiders, fasten water leak, (i) let out gutters to remove the standing water and reduce moisture that can be collected,” suggests the exhaust.

Bagnara also recommends verifying whether your time is removed in good shape, because they are usually damaged with frequent use.

FAQ

  • DIATOMEJNA Earth (DE) is an unshopulous powder that is not toxic to humans, but is effective in treating insects. Bossel recommends mixing vinegar, dishwasher, water and together for the natural centiped murderer. Bagnara recommends devastating your space.

  • Stonipedenics prefer to be in dark, moist and smooth locations. Bagna shares that the basements, under the sinks and in the vicinity of water extrips and drains are common sites for finding centipeds. Bossel also recommends checking your attic and crawling for all input points.