This is the best fan placement for maximum cooling, HVAC

Key points

  • The way you place the fan can change drastically how the air circulates in your space.
  • The fans ask to blow cold air into a room or smoke warm air from the room, and did not indicate directly with your body.
  • Use two fans to maximize air flow through the space by creating a suction and exhaust effect.

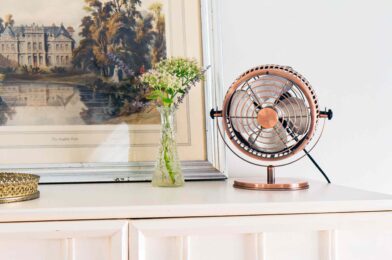
When your home in summer sews hot, nothing makes up as striking as stagnant air. Fortunately, fans quickly eliminate this problem. Even homes with functional HVAC systems can benefit from a good fan set. But what is the best fan placement for maximum cooling?

We talked to some HVAC experts on the optimal fan placement so you can get the maximum cooling effect.

Meet the expert

  • Jon Gilbertsen Is the licensed HVAC Technician and President Chris heating and cooling.
  • And Simpson Is the licensed HVAC technician and co-owner of heating and cooling for air processing.

What is the best fan placement for maximum cooling

According to Jon Gilbertsen, the licensed HVAC technician and the president on Chris heating and cooling, the best placement of the fan for maximum cooling consists of three points. In his opinion, the fan should be:

  • Across from the window or open door.
  • Angled gently upward.
  • At least one foot from walls and furniture.

For an even better cooling effect, suggests facing the fan in different directions, depending on the temperature schedules between spaces.

“Face the fan in the room if it is cooler outside and turn towards yourself, if it is hot outside,” he recommends, adding it is key to keep it in a few inches of windows or openings.

Want a more home advice and inspiration of reno project? Sign up for our free daily newsletter for the latest needs for TOS, Reno and more!

Proper placement of the ceiling fan

Until you can easily move the existing ceiling fan, here you should know before installing the ceiling fan in your space, so you can maximize its air circulations and cooling capabilities.

Gilbertsen recommends placing ceiling fans in the center of the blades of the blades at least 7 feet from the floor and 18 inches from the walls to ensure the right air flow.

Errors for avoiding for fan placement

Regardless of how you prefer to set your fan, avoiding these fan fans to help you maximize its cooling ability.

Setup fan too close to obstruction

Positioning a pedestal fan too close to something such as wall, furniture, curtains or other obstructed objects, you can drastically reduce air flow. If the obstruction is in front of the fan, it naturally blocks the air.

However, if the obstruction is too close to the back of the fan, it can prevent sufficient air from entering the fan.

Directing the fan directly to your body

We all heard that fans make you feel Cooler, but they don’t really cool the room. Although this is true, you may be surprised when you learn that a fan that is directly in your body will probably not achieve the optimal cooling effect. Gilbertsen says that, although it may feel good well, everything you achieve by pointing to the fan directly on yourself, smokes the same warm air around your body.

“Setting the fan near windows or open doors, where it can extract the cooler air or push hot air, helps to change the air in the room and it actually makes a space fridge,” explains.

Targeting pedestal fans down

Gilbertsen tells us that many people make a mistake by targeting pedestal fans down if they sit or lie, but it doesn’t actually cool them faster. Instead, targeting fans down often pushes the air along the floor, causing it to lose strength and disturbing abundant circulation.

“Even if you are closer to the earth, you feel more air flow if the fan picks up slightly up so that the air has room for moving and spreading,” explains.

Other Honest Tips Cool

Here are other efficient ways to feel cooler and more comfortable during a melting moon:

Work with the natural flow of air for home

Dan Simpson, licensed HVAC technician and co-owner of air treatment and cooling, suggests the use of fans to strengthen the natural flow of air, not working against it.

“Take the time to observe how the air is naturally moving through your space, then set the fans to improve that movement, and do not fight against it,” says Simpson against him, “he says fight him.

Use two fans instead of one

Both Simpson and Gilbertsen recommend using two fans instead of one to create an even greater cooling effect.

“For maximum cooling with windows and exhaust fan Create cross ventilation by placing lucrative fans to the cold side of home (usually north or east),” Simpson explains.

This will help you pull the cold air and push the hot air, creating a way through your home, “Simpson says.

Use fans to ventilate the melting upper level

When it comes to cooling home as a whole, Simpson recommends the installation of fans into the windows on the upper level, blowing the hot air.

“This creates a vacuum that pulls the cooler air through lower-level windows and helps deviates from hot air that naturally rises to the top of the house,” Simpson says.

7 “Elegant” trends that could actually lower your home value

Key points

  • Funting Home Trends often do not complain about potential customers.
  • Experts careful against excessively personal upgrades.
  • Excessive technological upgrades can also alienate potential buyers that are less technologically all.

While some deleted designers can enhance the value and charm of your home, others – in spite of their popularity – it can work quietly against you. From a tictok-known color technique to ultra modern technological upgrades, certain aesthetic decisions cannot be echoed with potential customers or stand the test time.

While we are all for your home your own, understanding which decor trends can lower your home value you can help you if you plan to sell in the near future. In general, interior and real estate design are agreed: too strongly relying in the housing in the house can easily go out on the home and lower their value on the market.

Meet the expert

  • Missy Derr is a real estate counselor with Engel & Völkers in Atlanta, Georgia.
  • Olga Doykhen is an interior designer based in Orange County, California.
  • Rachel Blindauer is award-winning designer for interior and furniture based in Sarasota, Florida.

In color

Internet The warmest color trend may not be the best choice if you plan to soon plan to sell your home.

We heard this before: the neutral are the best when it comes to selling your home. An excessively bold color selection scream over personalization, alienating potential customers who are uninterested to rewind the space after closing sales.

“Even the most exciting trends such as color stabs can turn off the customer as everything they see is money to cross home,” says Missy Derr, real estate counselor with Engel & Volkers in Atlanta, Georgia.

Fortunately, the reeling of your walls is a relatively simple and affordable project that can be easily done while preparing your home for the market, so if you don’t specify your home, don’t be afraid to express color colors. We’re not ready to let go of the color only.

Do you want more design inspiration? Sign up for our free daily newsletter for the latest decorable ideas, design advice and more!

Exhausted all

Credit:

John Keeble / Getty Images


Fluted linings and coated linings are another popular home trend that promotes professionals. What you sometimes feel elegant and top edge, started feeling generic and excessive, and customers no longer love him, says Olga Doykhen, interior designer headquartered with Orange County, California.

“I’ve seen (to) very much in renovating construction grenade,” she says. “When translated, details lose sculptural impact and start feeling massively produced. It is especially problematic when applied without considering the architectural language of the home.”

Instead, go to timeless rather than trend. Take into account the architecture and style of your home, and wherever possible, decide for quality natural materials for the look that will feel true timeless.

Excessive smart home improvements

This one can come as a surprise, but Derr says technological improvements in the house are not always victory. This is for several reasons, but mostly because the technology is changing rapidly and can be expensive to upgrade and replace. And they don’t worry everyone have their entire activated home voice or compatible to technology.

“Energy efficient upgrades add value, but things like overflows to control applications or the color change are not allowed to be appreciated, understanding or really desirable,” says Derr “, says Derr.

“Instagram beige” minimalism

Warm, earthen color pallets are large in the interior design and home decor at the moment, but minimalist spaces are washed, they do not read in real life as they work online, it is said online, says online. It is like a gene with the version of the “Millennium Gray” – lacking depth, character and personality.

You don’t need to be completely ashamed of minimalism if you want. In fact, the minimalist decor is ideal for home homes. The key works exactly that space still feels warm and attractive. Think of layered neutrals with contrast, not monochrome neutrals, says Doykhen.

“I prefer ivory and espresso, chalk and tobacco paired with tactile materials like frieze, cashmere, oak and patinated metal,” she says.

Tile statement

Credit:

PixelCatchers / Getty Images


The tile is commitment, so, while the daring statement in the kitchen and bathroom has a moment, experts agree that neutral and timeless best if you plan to sell your home in the near future.

“These spaces are expensive to rearrange and remain intact for years, sometimes even decades,” says Derr .. Too many ‘personality’ can be too much for the next owner. ”

But it goes too neutral in the kitchen and the bathroom can be equally problematic. All-white cuisine and bathrooms feel cold, sterile and uninviding, says Derr.

Instead, decide for a happy medium. Keep classic and timeless shapes, natural materials and warm neutrals with a proven tracking record.

Excessive open shelves in the kitchen

Perfectly shaped open shelves in the kitchen can look idyllic on your Pinterest plate, but in real life, potential customers see a mess and lost storage opportunities, says Rachel Blindauer, award-winning designer for interior and furniture.

This does not mean that you have to call goodbye to open completely in the kitchen if you love the look. The trick is a striking real balance between stylish and practical.

“Balance closed and open storage is injurely,” says Blindauer. “Minimize open shelves – show some sculptural bases, not everything from your pantry.”

Accent walls with shaping

Gone are the days when the stressed walls are simply painted in contrasting shades. Now the accent walls with a wooden lining or style design, and experts agree that there are difficult sales in the real estate market.

This is because if the customer does not like the look, he will only see a potential cost and work that deals with removal. Not only will he have to descend and cancel it, but they will probably need to fix the wall, says Derr.

5 ways of approved designer to hide the garden

Key points

  • Use decorative containers, external storage boxes or wall mounted rings to hide stylish hoses.
  • Tuck hoses behind the bushes or use small screens and mixing fences with landscaping.
  • Choose a dark green or gray hose to make them less noticeable in the yard.

Having a garden hose in your yard in your yard is needed by most but stare at that all day when not using it is obviously not ideal. If your garden hose spasms your yard style, it is understandable to feel a little frustrated.

“Sometimes garden hose is the only thing that distracts from that otherwise a perfectly retained yard,” says Dallen Russell, Advisor to Renate with Insite Builders and Rearrange. “The arranged patio can have every detail, except for the traditionally bright green hose sitting in an entangled pile.”

Wondering how you will just be able to hide the hose so that it is easy to access it as needed, and still do not wonder in the cleaner? As it turned out, there is no need to worry too much; Professions have several suggestions for professional masking of garden hoses in the yard, and still ensure that it is easy to come.

Meet the expert

  • Dallen Russell is an advisor for remodeling with built builders and rearrangements.
  • Tracy Morris is the founder of Tracy Morris design.
  • Jordan Clough Is the director associated at the Richardson & Associates landscaping architecture.

Save your hose in a simple container

One smart way to store your garden hose is placed inside the tank, Tracy Morris, the founder of Tracy Morris design, explains.

“I like to use bowel skims or decorative bowls messing in the landscape,” she says, stating a stone, copper and aged terracotta as possibilities.

The style you choose is completely on you on the basis of shades that are already in your backyard.

Do you want more design inspiration? Sign up for our free daily newsletter for the latest decorable ideas, design advice and more!

Decide for the multi-purpose container

The second option is the use of a container that is slightly significant and can serve other purposes in your yard.

“External storage boxes can double as benches or small cabinets, providing functionality and concealment,” Russell says. Instant seating copies never looked better.

Try a wall solution

Credit:

Dalton00 / Getty Images


Morris is also an advocate of wall choles for the hose. Recommends to go with a finish that complements the hardware on the outer side of your home. It works, he says, keep things tidy without feeling out of place.

Russell also likes to use the hose roll and is partial for Giraffe Tools especially the garden hose roll.

“Conclusion of the hose at any length during use, then retire in the attached case, holding it completely hidden when not necessary,” he says.

Tucked the intestinal hose

Another tactic that Morris recommends is that greenery is used in your backyard in your favor (or plant a little more if necessary) and tie your hose behind the bushes to hide it.

Jordan Clough, associate director on the landscape architecture Richardson & Associates, agreeing to be shrubs like cherry Laurel, sortil for Dwarf Arborvitae, and other evergreen bushes for work.

“They really help the housing in the rest of the landscape,” he says.

Morris also notes that the purchase of a small screen is and use the fence in your hose when one is not used one is a sustainable option. Clough is also everything for the use of wood screening fences, which will be corresponding to the fence of wood in the yard for which it is possible. And a wooden fence is not useful for respecting the bowels.

“The housing can also help to contain things like oversized candidates and / or recycling bins or hide utilities,” Clown says.

Strategically choose bowel color

Credit:

Cappi Thompson / Getty Images


Perhaps the simplest solution of all, and the easiest to implement if you buy a new hose, it is easy to be strategically with the color you choose. Russell recommends a departure with a deep green or dark gray style; If you do, you’ll do it hardly noticeable in your overall landscape, he says.

Should you be watering your garden at the top of the sun? Gardening Professional Weigh

Key points

  • Watering during the top sun will not allow water to reach herbal roots.
  • Instead, you should guide in an early morning or later evening to avoid the heat of the day.
  • Increase your summer water success by making it part of your daily routine and watering into the soil instead of the plant.

It is vital when watering your garden, so do not come across future questions. For example, water too late, and every day drinks your plants depend on advancing in the summer heat will evaporate without the roots do not absorb them. On the other hand, water too early, and your plants can be found sitting in the start of water, exhibiting the potential of rolling rot and other plant diseases.

We share advice from Basterski experts in front of us why you would avoid the top sun during the watering of the garden.

Meet the expert

Do you need to lead your garden during the peak sun?

The answer is generally no, not water at the peak sun, mostly between 10 hours and 16:00.

“The fruit is more likely to evaporate before the roots are able to absorb what they need,” says Morris Hankinson, Garden Expert and the General Manager Hope Nada Nada.

Therefore, it considers that this is a common fault of watering and losing water and time – can even potentially emphasize your plants by introducing a sudden temperature change.

However, there may be a single warning that will consider when it comes to watering in the peak of the sun. And that is if you have a plant seriously fight in the heat of the sun, and you can’t lead in the evening or early morning. If this is the case, then only front and water deep into the ground under the plant, says Hankinson.

“You better help a fight plant than it’s hard to revive later,” Hankinson says.

Want more darts tips? Sign up for our free newsletter for our best growing tips, troubleshooting and more!

The best time to water your garden

If you shouldn’t guide at the peak of the sun, when is the best time to water your garden? Early morning is the best, but the Liege, the garden expert and the founder of TreeMend, explains.

“Generally, before 9:00, he is ideal, allowing time to soil absorb water before the sun is strong,” he says.

However, in the middle of the morning, it is acceptable in colder times of the year because the potential for evaporation will be less problems.

The second time for water is in the evening. Watering in the evening is generally best during the summer and in warmer days, Hankinson explains. This allows time plants to absorb water and nutrients from the soil after the heat passed. However, it warns, if you have snails and want to solve them, water in the morning, because they can be more active in the evening, and will love moisture.

Tips for watering the garden in summer

Gardening professionals More The best top tips for watering the garden in summer, so your plants and lawn remain happy and healthy.

Make a part of watering your routine

One way to integrate water in the garden in your mornings is to establish a daily routine. Wake up 15 minutes earlier than you normally work, says Hankinson and make a cup of tea to enjoy while watering the garden in the morning.

Having simple pleasures like this, early early early on water will feel less than the coast.

Don’t take your lawn every day

This is a great way to use less water in your garden, and it is especially true if you live in an area that is experiencing summer water shortages. There is simply no need for water every day, says Hankinson, even if the lawn begins brown.

“The grass has an amazing ability to soon again green when it rains,” he adds.

Instead of watering lawns, priority watering of the garden and other plants that may need more water in dry, hot times.

Water in the ground

So don’t water over the top of the plants. These are the roots that need water, so it will do it deeply rather than sprinkle water every day, will keep your plants healthy, says Hankinson.

In addition, water level watering will help avoid overwining the list, which can create a higher risk of illness, says Lee.

Wipe any water on plants leaves

Check your plant sheets don’t have huge amounts of water left on them.

“Water drips that sit on the sheets can behave like small boosters and the worse factory,” says Lie. Therefore, you would not only waste water, but also damaged the fields of the plant in the process.

Add Mulch

Finally, think about adding Mulch to your garden, which will help you keep moisture for your plants between the water. For most success, use a SOJKER hose or watering a stick and often refresh Mulch, Liever recommends.

How often are they researched on the lawn – 3 Signs Gardens never ignore

Key points

  • Reseed Cool-Season lawn per year or twice if they saw great spending or neglect.
  • Skipping skipping can lead to patchy, thin grass over time.
  • Prepare well and spread seeds in all four directions for even coverage.

Reseding is a preventive measure that you can take to avoid potential headaches such as lawns. Holding his lawn thickness through reseding, subtract the weed of the space that would otherwise advance.

So, at the same time involves some costs and some work, in many cases, you should really resam your lawn more often than you may think. But how often do you need to re-set again?

What is being visited?

“Possible”, as used here, is synonymous with “excessive.” They both relate to the practice of sowing the seeds of the grass over the existing lawn to promote thick growth. It differs from the practice of sowing the seeds of grass on earth where there is no grass that currently grows to create a new lawn from zero.

How often should you solve your lawn on the type of lawn

How often you should be divided partially depends on the condition of your lawn, which depends on things like a climate and a leg. But another factor is simply the type of grass you have: Cool-season vs. warm season. Explore these factors more detailed to try to answer the question of how often you should resume your lawn:

  • Super-season grass: Move this year, unless they became neglect, a lot of foot traffic or challenging climate.
  • Hot-season grass.
  • Lawn with high traffic: Move them twice a year to oppose high foot levels.
  • Spills / neglected lawns: If your lawn has been neglected for a long time, you will need to play compensation by resident twice a year.

Want more darts tips? Sign up for our free kindergartens Bulletin for our best tips for breeding, troubleshooting and more!

So it’s time to move

I hope you will keep your resected mode before You are forced to take action to repair problems. But where there is a lack of thoughtfulness, there will be warning signs that will appear to inform that you need to relocate, such as:

  • Weeds begin to take over: It is normal to see the weed here and there in the lawn, but when weed come in bunches, it is a sign that you were not faithful in relation to resj.
  • The grass begins to be tanji: If your grass doesn’t grow so thick as it used to be used, essentially cry to visit.
  • Your lawn loses vitality: The lawn can take a long time, but nothing lives forever. Your lawn can slowly lose vitality over time (for example, it will not grow so fast as it used to be). It is a sign needed to be reinforced with a resident.

How to relocate for best results

Preparation is crucial for successful posters. Your main task is to ensure that the seeds of the grass will fall into a place where its chance of germination are maximized. Mow the lawn to start, then it works hard. Reason will take care of two things:

  1. Will remove the clips of the grass (assuming you don’t have a mower for mulching).
  2. It will remove thatch.

Sprinkle 1/2-inch compost layer over the lawn. This seed will give something to root.

When spreading seeds, aims to optimal coverage by pushing the spreader in all four directions. Because this implies that it covers the same soil twice, cuts the recommended precedent speed (found on your seed bag) and fill in your spreader accordingly.

Slide the spreader north to south, then south to North, until you covered the entire lawn; Then push it east to the west and west to the east, covering the entire lawn again.

FAQ

  • Can I solve only patched areas?

    It is more efficient and more efficient to solve the entire lawn, and not try to select only non-bounds (thinners) areas.

  • When is it too late to move?

    Late Summer is a great time to resord a cold seasonal grass, until you are in the heat wave, in that case aim early autumn. Behind that, there will be no warm weather for seedlings to keep before winter.

Why your garden is bound – even is a lot of water, they say gardener

Key points

  • After watering, only the stress are stressed by stresses to save moisture, but usually recover by evening.
  • In progress, it can be called shallow watering, rot, a rot, bad drainage or compacted soil.
  • Water deep, use Mulch, check soil moisture and hold the soil loosely to hit the plants in the summer heat.

It is natural worried if you see that your garden looks like it is tied, even after a fundamental watering. Lack of water is not always the culprit and could be other things in the game when it comes to plant.

“The vetor doesn’t mean you always work to do something,” Tabar Gifford, masterful gardener and a partnership cultivator on American meadows and high countries, says. “It is often a sign for pause, observation and diagnostication before responding.”

So why could your plants bend? We talked to Gifford and another artificial expert why it could happen and how to get your garden to reject.

Want more darts tips? Sign up for our free kindergartens Bulletin for our best tips for breeding, troubleshooting and more!

Why does your garden look like he is washing, even after watering?

Experts say that it is natural for some plants to show binding in the late afternoon sun due to the intense summer sun and heat, no matter how well they watered. It is a natural defense mechanism, which descends to reduce the surface and the disputed water loss.

“Leaves temporarily within the self-preservation strategy to reduce transpiration,” says Dr. James S. Master, Founder of Pistil and Polen. “If the plant plant is even the evening or next morning, it is probably just a thermal stress – not a sign that underlined you.”

You will know that this happens if your garden spoils by the evening. However, if not, your plants can experience root rotation (caused by overcoming), compacted soil, bad drainage, pests or diseases.

The garden can also be underwater or predominant, which also causes binding. If the plants do not receive enough water, it is likely to experience something called “silent drought”, which means that the top of the ground will be wet, but the roots remain dry.

“This can happen when watering too shallow, rain is light or warmth and wind towing moisture from soil faster than it can ask,” Gifford said. “The roots can be robbed even as the top layer looks fine.”

How to check if you are getting water enough

Malaster suggested this trick to check and see if your plant will get enough water.

  1. After watering, insert a spatula probe or soil a few inches deep into the ground.
  2. Remove and see if wet or cheeky.
  3. If it indicates that the soil is below the surface still dry, you will need to water a plant more slowly and deep.

4 other summer ribbons with tops of advantage

  • Water early in the morning. This will let plants absorb moisture before the warmest part of the day and prevent water from evaporating.
  • Use Mulch on the roots. It will help maintain a key part of the plant part of cool and help lock moisture, but at the same time no stems, stems or troops of your plants.
  • Check how much rain actually watered your plants. Don’t skip the hydrating your garden only because of light showers. First, make sure the rainwater has reached the root of your plants. If not, they still need watering.
  • Hold the soil healthy and carbonated. This is provided free to move on the roots and maintains a plant by hydration.

Does the diatomacean country kill spiders? What should you know

Key points

  • DIATOMEJNA Earth dehydrates and kills spiders – it is a safe, affordable alternative to chemical spray.
  • A slight entrance to the dust, basements and attic; Reapply a week with safety equipment.
  • You can also deter spider with peppers or vinegar, vacuum networks or use targeted pesticides.

While spiders can certainly be useful, eating flies and other irritating insects, most homeowners prefer to stay outside. Fortunately, the Datomast Earth is a natural insect bumper that can kill spiders and other errors in your home safely and effectively.

Learn exactly how to use diatomine country to get rid of a spider in your home, as well as some alternative shapes of pest control that you can try.

Does the diatomacean country kill spiders?

The diatomacical country is an effective anti-insect agent that can eventually kill various bugs. This fine white powder is an abrasive substance that interrupts the exoskelet of spiders, ants, fleas and other mistakes, which dehydrate them and kills them with time.

Diatomaylar land is a great alternative to those who want to avoid solutions to control pests made with sharp chemicals, and as a added bonus, it is also very affordable.

Want more cleaning and organizing advice? Sign up for our free daily newsletter for the latest hacks, professional advice and more!

How to use a diathomenal country to kill spiders

Before you start using a diatomine country, identify what attracts spiders to your house in the first place. Maintaining home and spot, locating and sealing cracks in your compound, by replacing worn weather and dealing with excess moisture in your home you can take a few steps to extract spiders and give this natural insect by repelling your spider problem.

  • Sprinkle a thin layer of diatomestical country around any potential access point where spiders are likely to come inside. This includes doors and windows, as well as all the remaining visible cracks in your side ships, gardens and the like. You want to encourage spiders to pass through the diatomine earth, so be sure not to apply too much in one place. Gently dust should be your goal!
  • Sprinkle diatomine land in basements, attic or other storage spaces. These are the prime minister of hidden spots for spider, so it is important to set up a diatogy country in these areas.
  • After one week, clean the diatomine country and apply again if necessary. If you have applied any diatoms outside the home, you don’t need to read it, but consider re-application.

While the seal is a secure product, always use safety equipment such as gloves, masks and glasses during cleaning. Vacuum diatume country with a trading Vac instead of in your regular vacuum or wipe the substance with a damp cloth.

Advice

If you have pets or small children, avoid spreading diathomic countries in areas that are easy to access them to prevent them from inhaling the substance.

Other ways to get rid of spider in your home

While the diatomation is a secure and effective pest, there are some alternatives that you can consider to get rid of the spider in your home.

  • Make the DIY spider bumper. Certain odors, such as peppers and vinegar, can be used to refuse spiders and other insects, so consider making your own pace. You can mix with equal vinegar and water in a spray bottle or add 10 drops of mippermen oil into a spray bottle filled, and then spray potential spider detection entries. Keep in mind, this homework solutions will just reject spiders, but they won’t kill them.
  • Vacuum spiders, web and egg bags. Vacuuming spiders, especially their bags of eggs if you can locate them, you can kill the creature and prevent your spider infections to get any larger.
  • Apply pesticides to potential access points. Traditional pesticides are not always effective in the killing of spiders. Most errors pull their bodies through chemicals and eventually die, but spiders have long legs that allow them easy sliding over the solution. However, if you want to try to use pesticide, targeted areas where spiders enter home, such as windows, doors and any other cracks and cracks.

FAQ

  • Diathomine country can kill a wide range of errors, including cockroaches, ants, bugs, bed mistakes and more. Although it does not kill pets or people, the product contains silica, which is not good for our lungs in large quantities. Keep pets and children from powder and avoid inhale that best you can.

  • Yes, until nothing disturbing the powder and does not cause you to inhale it, it is safe to sleep in a room with diatoms.

  • Too many diatomestic countries can be ineffective. If you apply a thick layer of a diatogy country to deter spiders, pests are likely to avoid powder. It is important to use a thin layer, so the spiders will walk the substances.

8 plants gardeners always dead in august – and why you should

As summer peaks and your garden are in full swing, it can feel like a perfect time to set the bar tools to the side and deserve a deserved break. However, experienced gardeners know that many plants can still benefit from regular maintenance, even while summer begins to fall.

The network – a simple act of removing spent blooms – one is a task that should not fall with the journey this month. Not only does it understand that your garden is considered in the office, but also encourages many plants to continue to produce flowers well in the season.

Several strategic rials this month can ensure that you enjoy the fresh flowers in the fall months.

According to the professional gardeners and florists, here are the upper plants you should try to keep your garden that progress through the fall.

Meet the expert

Grace Krueger Is the founder and a florist behind Lulabelleine flowers, located in Burlington, Kansas.

Want more darts tips? Sign up for our free kindergartens Bulletin for our best tips for breeding, troubleshooting and more!

This trash cleaning will clean your drain in no time

Key points

  • Use baking soda, vinegar, hot water, ice and citrus for cleaning and deodorization of your garbage.
  • Avoid sharp chemicals; Use cold water, salt or snake for drain for hard clogs.
  • Don’t pour fat or oil; Clean regularly to prevent accumulation.

If you have lucky enough to have a sink with garbage disposal, you know how useful it can be during everyday cleaning. However, if you are disposing of garbage in a rough shape and needs to be cleaned and revived, you may be wondering what further. It said, don’t be so fast to run into a store looking for a solution.

“Defending garbage is often overlooked when it comes to routine cleaning, but with a real DIY approach, they are actually very easy to maintain,” says Jared Sarbit, General Manager Image Perfect Cleaning.

It is more than likely to have all the materials you need to fix this problem abolishes into your pantry. Here cleaning experts outline the process involved in cleaning your garbage disposal using basic bases and also divide what to avoid to ensure that your drain is clear in the future.

Materials

  • Baking soda
  • Vinegar
  • Hot water
  • Citrus peels and ice (optional)
  • Measuring glasses

Want more cleaning and organizing advice? Sign up for our free daily newsletter for the latest hacks, professional advice and more!

How to use DIY garbage disposal

Below is a five-step process based on the advantage of the cleansing, which we have interviewed, which describes the best way to use your DIY for disposing of the trash for successful outcome.

  1. Prepare baking soda. Recharge the measuring glass with 1/2 cup of bicarbon soda and pour it available.
  2. Prepare your vinegar. Complete the measurement glass with a cup of vinegar and pour that over the baking soda, which will result in a physis noise, explains Scott Schrader, cleaning expert in Cottegecare. “This chemical reaction breaks fat and grime,” he says.
  3. Allow the mixture to react. This process will last about 10 to 15 minutes.
  4. Wait for the fizz stop. When fizzys, slowly pour three cups of hot water down the drain.
  5. Consider adding ice cubes and citrus peeling. Once you finish this procedure, you can run some ice cubes together with lemon or orange crust through garbage disposal; Schrader notes that this is an effective way to remove residues from the blades, and at the same time you get rid of any unpleasant odors from the procedure.

Drain cleaning tips

Credit:

-Oxford- / Getty Images


Cleaning experts we talked with offer several tried and true tips for keeping drains at all times. Triguling to facilitate your drains with the daily attention and day in exit, they will prevent you from dealing with heavy tanges down the road.

  • DIY when you can. Not only is it easy to buy a pantry, but it’s better for your drain. Schrader recommends using a DIY mixture that is highlighted above, unlike spilling sharp products of purchased chemicals down the drain, because they can ultimately damage your sinkpiece.
  • Run cold water. To prevent damage in the future, Schrader suggests that cold water flow during and after the use of disposal, as this will help completely resolve food particles.
  • If necessary, use salt. If you are engaged in the main accumulation in garbage disposal, salt can help. Schrader advises a mixing of half a cup of salt with your half cup of baking soda, and then adding vinegar and hot water to the above.
  • Try a snake to help you in difficult situations. You can also try to use small clip or snakes in the sink to help with Tougher Cogs, Sarbit adds. It recommends that this follow the following baking soda and acetic reaction and believes that this is an effective alternative to using sharp chemicals.
  • Don’t pour certain liquids. Your garbage is not equipped to handle all types of liquids. For example, you should not pour fat or oils down; It is often the main source of accumulation, sarbital explains.

How often do you need to wash towels in the summer? Painary Pro Weigh In

Key points

  • In summer, towels should be excluded every 2-3 days and wash out per week.
  • Humidity in the air keeps towels from drying completely, which could lead to odors.
  • Keep towels in airy containers and ensure that they are completely dry to keep them getting out.

Everything is dirty in summer: temperature and moisture guarantee that everything that sweat can be sweated. The last thing you want at that time of year is to dry freshly cleaned hands, face or whole body on a dirty towel – do you realize that it is dirty or not.

We talked to a group of laundry that pointed us how often we need to follow towels in the summer, and the spoiler: That’s a lot more than you think.

Meet the expert

Nia Thomas is the co-owner of Laverie Laundromat in New York.

How often do you need to wash towels in the summer?

Generally, you should follow towels per week. If you do this less often, but behind in particular In summer.

“During the flight that changes. Ideal, towels should be changed every 2-3 days,” says the artificial washing Nia Thomas.

Depending on where and how often use towels, this time line will vary. Here’s how often Thomas says to wash different types of towels:

  • Face towels It should be followed every day, especially for people with sensitive skin. “You can operate them immediately after use, tighten the stock that will take you through the week or use environmentally available disposable towels,” Thomas says.
  • Hand towels It should be washed every 2-3 days, especially when used repeatedly several times a day by more people.
  • Bath towels It should be washed every 2-3 days in the summer.
  • Beach towels should be washed after each use, but with a little more attention. “Always shake the sand before washing, and if they are exposed to salty water or pool chlorine, run them through a rinsing cycle before adding a detergent to avoid building or faded,” Thomas says.

Want more cleaning and organizing advice? Sign up for our free daily newsletter for the latest hacks, professional advice and more!

Why does the summer make a difference?

Thomas mentions that you can continue feathering per week until the towels are completely dry before they are placed in the brake. This component is crucial because the moisture that keeps your towels that are as cleaner.

“The key culprit is not just a sweat that often leads to more showers and use of a towel, it is moisture,” Thomas says. “Increased moisture in the air means towels dry slower, creating a perfect environment for bacteria and mold to progress.”

How to keep towels from becoming milk

Near towels that are often accompanied, you are risking to become covering. But sometimes, even with consistent washing and care are still developing that acidic scent. Here are a few ways in which Thomas suggests you can keep that from happening:

  • “Check that the towels are 100% dry before assembling or storage; even a small moisture can lead to the fold,” she says.
  • When storing a towel, add a dryer, block cedar or lavender bag and baking soda to mitigate excess moisture and odor.
  • Instead of sealed plastic buckets, decide to store towels in more flexible, airy vessels.