6 things you should never clean with lemon juice, for cleaning

Key points

  • Lemon juice can root electronics, strips and damage wood, stone and cast iron due to high acidity.
  • Experts warn of use on aluminum, brass, copper, electronics, wood, cast iron or stone surfaces.
  • Despite its fresh smell, lemon juice can cause expensive or irreversible damage if used on the wrong materials.

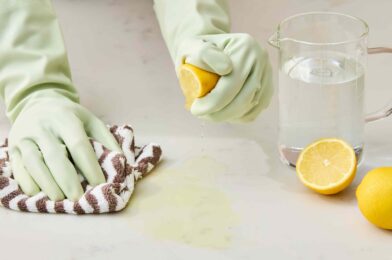
Lemon juice is often moving to the ingredient when it comes to household cleansing because it is easy to add to Briy Cleaners, thanks to fresh scent and sour qualities. However, its high level of acidity can also damage certain surfaces or objects.

We touched some Pro funds for sharing an object to never clean with lemon juice so that you do not finish the taround or decor bedding.

Aluminum dishes

When it comes to cleaning the aluminum dishes, the Scott Schrader, the CothegeCare Expert and Founder, warns of lemon juice because it reacts with aluminum, leaving the surface of the oxidized markings and tasting food metal.

Instead, Schrader recommends the use of mild soaps for dishwashers aluminum.

Want more cleaning and organizing advice? Sign up for our free daily newsletter for the latest hacks, professional advice and more!

Electronics and screens

While you may be easily spoken by your favorite lemon cleaner on a TV screen or electronically for quick shine, it may actually do more harm than good.

“Acid liquid will infiltrate, encourage internal corrosion in a circle,” explains Schrader.

Phones, tablets, computers, and other electronics should be wiped with a damp microfiber cloth and an approved screen cleaner only for maintaining its condition.

Brass or copper

Be careful when cleaning your home goods from brass or copper, because lemon juice can immediately remove Patina, Jhon Lebaron, which is a co-owner of the Primavera cleaning service.

“This can be a good thing or a bad thing. Some people want these metals to be a great and new look, in that case, brilliant,” says Lebaron. “But many prefer darker patine finishes, and will be removed by lemon juice.”

Schrader agrees and explains how the acidity of the lemon will eat through varnish, which will remove the tarn, but also discover corrosion.

Wooden floors and furniture

If you deal with wooden floors or furniture, it is best to avoid the use of lemon juice because acids can damage the end to wood, and even to color change.

“The same pH-neutral cleaners you use at the counters are a good solution here,” Recommended by Lebaron.

Cast iron

Lemon juice will remove any spice with a cast iron bracket and left it more sensitive to the rust, says Schrader. It recommends use of hot or boiling water and peeling brushes to properly clean the cast iron.

Marble and Granite

When it comes to marble and granite surfaces such as the biter, Schrader recommends that it remains far from lemon juice.

“Sour of lemon juice erodes the polished surface of marble or granite, leaving clouds of stains that can only be removed with professional resources,” explains Schrader.

Instead, try using a marble cleaner that is a pH neutral stone cleaner.

Hola Frida (2025) (NR) – 1.3.1 | Parents Guide and Review

Amenimate ratingsWhy is “Hola Frida” rated NR? MPAA did not rate this film. Children’s assessment –in-mind.com includes a kiss between young girls and young flirting scenes, a young girl who suffers from the police, who suffers from epilepsy, the debate on overcoming insurable coefficients and finding purposes in life and some mild calling. Read the title of our parents for details on details Sexual content, violence And strong language.


An animated characteristic based on life Frida Kahla (with Voice of Olivia Ruiz), a famous Mexican artist, chronicist her struggle with a polio, and her relationships with her family, as well as her imaginary friend. Also with Emma Rodriguez votes, Rebeca Gonzales, Léo Côté, Sophie Faucher, Manuel Tadros, Annie Girard and Joey Bélanger. Directed by André Kadi and Karine Vézina. Several dialogue lines are discussed in French and Spanish language with English translation. (Work time: 1:22)

5 bathroom lighting errors that emit space immediately, the designers say

Looking at the Major upgrade your bathroom? The solution can be all in your lighting. It does not include the right types of schedules in your ready space, can put a large damper how you feel in this room home from a functional and aesthetic perspective. Fortunately, making a little small but shock factories can easily turn things.

We talked with three interiors designers who share five common binquen brightness buildings that people always need to avoid in their homes, and what would intend to instead.

Using only one type of light

Credit:

Elliott Kaufman / Getty Images


In any room, whether it is your main living room or your bathroom, it is important that you do not rely on one type of light, they are marked. Why exactly?

“Relying on just one overhead light throws the shadows and makes tasks like shaving or makeup, says Andrea Schumacher, Founder of Andrea Schumacher Interios.

But it’s not just a big light that’s a problem. Similarly, relying exclusively on Vanity lights are not excellent, the designer adds, noting that they can result in “inconspicuous shadows”.

Your better bet is a layer in several types of lighting, resulting in a mixture of ambience, task and accents of everything that work in tandem, as recommended in any other room, explains Schumacher.

Do you want more design inspiration? Sign up for our free daily newsletter for the latest decorable ideas, design advice and more!

Installing Vanity Lighting Wrong

Credit:

William Geddes / Getty Images


Speaking of vanity, it is important to note that these matches should not go just above your vanity, Lesley Myrick, the founder of Lesley Myrick interior, explains that it is best to mount the scons at the eyes of the eyes and place them on both sides of your mirror.

This tactic, says, is optimal for various reasons, noting, “even flattering light on the face, ideal for your routine skin care or makeup.”

How it relates to specific fastening heights, Robbie Maynard, the founder of Robbie Maynard interior, recommends installing Vanity bar lights around six or seven feet from the ground. Another combination would be paired this light height with a mirror greater than six feet, the designer explains, noting that it will do so in creating a more spacious and elevated bathroom.

Not taking into account the correct physical placement

Credit:

Andreas von Einsiedel / Getty Images


In addition to setting up the functions of your bathroom so that they are beautiful and functional, you will also want to keep in mind that their position does not mix how you use space, explains space, explains.

For example, she says, when it comes to wall sconce, you will want to ensure that you can open and close your medicine closet without striking one of the scons. And if you use a chandelier, make sure your bathroom door is not conducive while opening, of course, adds.

Using the wrong bulb temperature

Do you think all the varnishes are created equal? Think again. Schumacher emphasizes the importance of landing on the right light bulb temperature for your bathroom.

“Too cold feels sharp, too warm feels orange,” she says. The best temperature of the bread bulb temperature is 2700K-3000 Kelvin, which says it will create a “flattering glow.”

It is prepared for the day and winding while following the skin care routine at night never looked better!

Not putting a real schedule in the right area of ​​the room

The last thing you want to do is spend time and choosing energy and installing the bathroom talking to you, just to learn that they are unusable for where you set them up. For example, while Maynard finds that chandeliers can look wonderful in the bathroom, she warns that they ever install them above the bathtub.

“It can be dangerous if fixing can be touched while standing in a bathtub or reaches shower spray,” she says.

Instead, you are a lot of better hanging chandelier above the sink or in another prepared NOK, if your space is a little bigger.

Do you need to seal your driveway before falling? We asked the pro

Key points

  • The accessences should be sealed before the fall, while the weather conditions continue to be suitable.
  • Sealing the access path when temperatures below 55 ° F are more harm than good.
  • Apply a seal before dropping to protect the driveway, reduce repair costs and makes it easier to remove snow.

The approach is an essential place to park your vehicles or access to the garage, so it is important to take care of this paved surface properly to prevent long-term damage and repair groups. Application of the sealant on the approach can be an effective way to increase the approaching path and protect it from common chemicals, such as oil or gas.

Although you need to ensure that you are using a high-quality sealant at the right time, otherwise you will eventually repeat the procedure every year. We have requested certified sealing pro if you should seal your driveway before falling and why.

Find out what he had to say on this topic below and pick up a few additional tips for the preparation of approaches to colder time.

Meet the expert

Randy Dewey is the main certified sealing applicator through the trident and the owner of the first choice of external cleaning.

Should you seal your access access before?

The attachment sealing helps to prepare the surface for sharp winter conditions, especially if your home is located in the region with refrigerator temperatures, snow and ice.

Randy Dewey, master certified sealing applicator via a trident and owner, explains that “as a temperature, water can see in tiny cracks in the pavement, and then freeze, expand and cause these cracks to expand.”

By applying the seals before falling, you can help protect the approach from the frost / defrost cycle, while creating a protective barrier from moisture, salt and chemicals, such as oil or gas.

Want a more home advice and inspiration of reno project? Sign up for our free daily newsletter for the latest needs for TOS, Reno and more!

Advantages of sealing the access road before falling

There are many reasons for sealing the driveway before the fall, although the most unique protection is. A good seal that applies in ideal conditions will protect the driveway of snow, ice, rain, salt, gas, oils or even physical damage caused by car tires or snow cross.

Ideally, the sealant will penetrate the driveway, creating a protective layer on top while strengthening concrete or asphalt. Before deciding if you should seal the driveway this season, think about this list of advantages given by Dewey:

  • Moisture protection: Keep rain, snow and melting ice from the penetration of the pavement.
  • Freezing resistance: Reduces shooting caused by spreading frozen water.
  • Salt and chemical protection: Guards from damage to travel salt and lifting products.
  • Increased endurance: Sealed adnants last longer due to elevated resistance to winter sharp conditions.
  • Reduced repair costs: Protecting access with the seal is preventing great damage, such as widespread cracks and holes, saving money.
  • Easier to remove snow: The closed approach is easier to clean from one with cracks, cracks and holes.

Disadvantages of stepping path sealing after falling

When the approach is sealed at the end of the summer or early fall, while the temperatures remain between 55 ° F and 90 ° F, and there are no actual shortcomings for sealing access. However, leaving this project is too late in the year can cause significant questions if you try to seal when it is too cold or humid. This is because the sealant will not be delayed or tied properly, which leads to losing time and money.

  • Bad hardening and connecting: Sealing when the temperatures of too low can leave a sealant sticky and impossible to form a permanent protective layer. Plan that this job is done while the temperatures remain between 55 ° F and 90 ° F.
  • Increased risk of crack: Application of seals late in the year can exhibit materials on low temperatures, which prevent proper adherence, leading to increased risk of cracks and gaps.
  • Reduced efficiency: When the seal is not applied in the right conditions, the resulting seal is already compromised as it applies, reducing the efficiency of moisture protection, freezing resistance and chemical protection.
  • Damage vulnerability: Incorrectly cured or bound sealing sealant leaves susceptible damage from winter, which can lead to moisture penetration, cracks of cracks or holes.

Tips for preparing access to colder weather

Cold winter weather can cause significant damage to an access road that is not prepared for sharp terms.

If you decide to seal the access before falling, Dewey suggests that for more than 2 years, I always recommend the water sealant. For more than 2 years, you can use water or water-based based or bodied. ”

Behind the attachment, there are several other ways in which the driveway ready for winter ready. Consider these tips when preparing your driveway this is the sun season.

  • Fix all the cracks before arriving colder temperatures.
  • The surface encumber the surface to remove dirt and the mold that accumulated during the summer and fall.
  • Open the surface by a penetrating seal.
  • Make sure you are sealed when temperatures are above 55 ° F either of the night and days.
  • Get rid of all dirt, weeds or loose residues that could keep a sticking seal.
  • Make sure that there is an access to the appropriate drainage and that the ground is to the level to prevent water from association.
  • Consider the previous treatment of access to a solution of ice or liquid anti-mires to prevent the ice from adherence to an access road surface, easier to remove.

Caught Theft (2025) (R) – 6.7.10 | Parents Guide and Review

Amenimate ratingsWhy is “caught theft” rated r? MPAA rating is awarded for “strong violent content, pervading language, some sexuality / nude and short drug use”. Children’s evaluation of children include the default sex scene, a few kisses, car scenes, and injuries to a man who keeps a stroke, drug discussions and displays the use of cocaine, numerous arguments, vikeling and almost 100 f words and other strong language. Read the title of our parents for details on details Sexual content, violence And strong language.


Man (Matt Smith) leaves his cat with a neighbor (Austin Butler), who is unaware of trouble, the man is inside, until several inconspicuous characters are not looking for something other than a cat on her front door. Also with Regina King, Zoë Kravitz, Griffin Dunne, Dominique O’Hagan, Action Bronson, Jake Bentley Young, Kitty Lawrence, Mike Frances, Chris ‘Mad Dog’ Russo, Nikita Kukushkin and Jurij Kolokolnikov. Directed by Darren Aronofsky. (Work time: 1:47)

6 characters Your freezer is placed on the wrong temperature and how to fix it

Key writing

  • If your freezer doesn’t work well, check for worn seals, dirty coils or an overly empty freezer.
  • Wet weather, dirty coils and old models can lead to freezers who cannot maintain the right temperature.
  • Thermometers can help you follow the temperatures in the freezer and refrigerator more precisely.

Behind the closed doors are difficult to say how to hold your refrigerator and freezer. Getting the settings of the correct and monitoring of maintenance is important to keep food safe and well preserved, so it is useful to know the signs when something is fine.

For the best advice, we talked with an expert that shared several signs of defective freezer and how to maintain your cooling system so that it works as well.

Meet the expert

Li Ling Young Is the main engineering advisor for Vermont efficiency, an energy efficiency utility.

It’s hot

While you can’t control time, it is useful to know when your fridge and freezer can work overtime to stay cold. This usually happens when it is hot and humid.

Li Ling Young Diors that units with automatic defrosting options fires the surrounding water, which is freezing on coils and requires defrost energy.

“That liquid water then introduced into a room when it evaporates in your kitchen,” she says. “You can help your refrigerator take advantage of less energy, and your kitchen stay cooler, by drying everything that goes into the refrigerator and covering food.”

Adjust the freezer temperature once you resolve this question (or any other) by finding a button or dialing in a freezer or refrigerator and entering the right settings.

Want more cleaning and organizing advice? Sign up for our free daily newsletter for the latest hacks, professional advice and more!

Dirty coils

Young shares that older refrigerators need cleaned coils, while newer models do not require it equally often. If you have an older refrigerator, it should be a priority on your cuisine cleaning list.

“A particularly dusty, oily or home environment may need to clean the condenser coils more often,” says young. “The refrigerator will tell you how to access coils and how often they need to be cleaned.”

Incorrect temperature readings

You can notice that your refrigerator or freezer says it is at a certain temperature, but on the closer inspection, it is not added up. You may find frozen objects in your refrigerator or Soggy, thawed food in the freezer.

This is a clear sign to shut down something. The best way to manage and monitor temperature levels is to your own tools that are not already installed in the unit.

“It’s best to get a freezer thermometer and keep it at 0 ° F or colder,” youth says. “The cooler should be about 35 ° F.”

To the door shooting seals

Young people recommend to review the seals on your freezer door; This is a rubber seal that surrounds the unit. If you find that shooting, crushing or damaged, it should be replaced as soon as possible.

Without proper insulation, your freezer is also probably too hard for temperature maintenance. This can lead to higher costs and energy for energy that does not remain frozen. In addition to replacing any work seals, be sure to clean them regularly.

Empty freezer

Credit:

S. Laiba Ali / Nontras


When you organize and clean the freezer, you may think it is better to clean and have emptiness. Fewer freezing foods means that it doesn’t have to work so hard, right?

Wrong. The empty freezer requires more effort to cool.

“Don’t place your freezer at maximum cold,” says young, “and hold it full. That way there is less space for warm air to enter when the door is open.”

Large energy bills

This sign is a big indication that your fridge and freezer fight to make things happy. Once you specify that this apparatus is the cause, you can explore if it needs to be checked, cleaning, or a new part.

Sometimes an energy-efficient freezer is an answer, especially if you have an older model.

“Choose the top-mounted freezer model for the highest efficiency,” says Young.

It also recommends recycling your other refrigerator / freezing unit if you do not have a need for a team.

Tips for an Energy Efficient Freezer

For a reliable freezer, and one that will not cause energy to accelerate the accounts, young people offered several tips for choosing a new freezer and maintaining the one you already have.

  • Choose a unit certified from the energy star. Young says this is a great indicator of efficiency. “Models of Energy Star On average, 10% are more efficient than standard models, and over 45% more efficient than those built 15 years ago, “she says.
  • Choose the right size. Young people say that the freezer units under 25 cubic rates are perfectly suitable for most homes. Choosing a device that is too much increasing your energy consumption.
  • Check insulation. Stay at the top of maintaining insulation on freezers and walls. Replace all parts that are damaged or decomposed.
  • Decide for modern models. They provide temperature and defrost control mechanisms that are smarter and more efficient than older refrigerators and freezers. Investment in advance will be paid in the long run.
  • Skip the ice camera. If you don’t need, young people say it can save up to 15% on energy consumption.

Pulled a dead plant from your garden? Here’s when your soil is safely planted a new

Key points

  • Identify why the plant died before handing over to prevent repeat problems.
  • Repair the usual errors such as stress for water or weather; PH and the disease last longer.
  • Sheltered ground with amendments or treatments to increase transplant success.

When a plant fails to progress, the time to wait before the transplant is affected by the plant type and cause of the original failure.

The state of the soil is crucial to determine this decision, as well as whether you can plant the same kinds or need to try something different. The time of the year is also important, like some many years and most trees and shrubs and shrubs progress better when they are planted in autumn or early winter.

How long have you been waiting for before transplantation

If your plant died because of the error in maintenance or unforeseen weather, such as a flood or drought, you can solve as soon as the basic problem is resolved.

Allow saturated soil to dry and then work in organic material to improve drainage. Time depends on your climate and the amounts of rain; However, you can accelerate drying by redirecting water away from the places to plant.

If the soil is completely dry, you will need to be rehidratated with deep watering and improve moisture retention by working in compost and peart or vermiculit. Once the soil is folded, it is safe to apply.

Fixing compacted soil is ongoing process. Order different varieties with deep executions to help remove the ground. The worm castings, compost, mulch and fertilizers improve soil consistency and oxygenation over time. For now, think about transplanting the variety with tolerant of heavy ground.

When the original crew was succumbed to the lack of nutrients or imbalance pH, take the soil sample into your Test Cooperative Expansion Office. This tells you what the additions are needed to correct.

Lack of nutrients can be overcome by adding organic and chemical fertilizers; However, the maintenance of good soil nutrition is during the process and depends on the correct pH. Lifting or lowering the pH soil can take from a few weeks to year.

When plants are subject to the pathogens covered by the soil, you must identify the disease. Solarization during the summer can kill some soil diseases in the month or two. Fumigation requires a waiting period with charging time, depending on the product used.

Plants resistant to planting and rotating herbal cultures help to remove disease vectors and improve microbial activity. The soil transmitted disease usually lasts the longest time to resolve before it is certain to state the same type of plant.

Want more darts tips? Sign up for our free kindergartens Bulletin for our best tips for breeding, troubleshooting and more!

Repetition in containers

Dead or dying plants grown container can be replaced quite quickly using different pots and new soils for pots. Check for your pots for sufficient drain holes. If the original pot is decorative, for the nursery with a nursery and place it within a more beautiful tank.

5 characters soil is ready to transplant

If you have taken steps to carry moist, dry or compact soil, here are five ways to say that it is healthy for transition. If the unbalanced pH or illness caused the original question, further testing may be necessary.

  • Color: Look for deep, rich, dark brown to black.
  • Odor: Good soil has a fresh, earthy scent.
  • Consistency: Wet small amount of soil and squeeze it in the poet. Should be shaped but rapidly falls apart.
  • Earthworm: Activity from living organisms, including earthy gleve and groundmakers are a sign of healthy soil.
  • Drainage: Use the humidity or stake to verify moisture and soil drainage after irrigation. Check for several levels deep up to 12 inches.

How to prepare the soil for new plants

Sheltered the soil before the transplantation in which the loss of plants improves your chances that something is growing on the spot.

Start by removing all herbal materials, including roots, any weeds that have developed other debris such as large sticks and rocks.

Use a digging shelving of 8 to 12 inches. Layer 4 inch compost, chopped leaves or other organic material and add sand if the soil is thick with too much clay.

Return the soil excavated and redeem for a jaw, blade or rototiller for the distribution of amendments to the entire planting area. Rake surface smooth.

FAQ

  • What happens if I plant too early after removing a sick plant?,

    Your chances of completion with other sick or dying of herbal plants. Even if the maintenance error, such as insufficient, or predominant, caused the plant to fail, the soil should be redesigned or replaced before transplantation.

  • How can I know if my soil is required to recover time?

    Detection What caused your plant to die directs steps to correct problems and how long it could take. Learning to identify healthy soil per color, texture and smell will help you know when you can solve.

  • What should I add the soil before planting?

    To a minimum, adding compost to the ground per year works with time to keep healthy for planting. Amendments such as sand, vermiculite and perlita improve drain and water retention. Raising or lowering the pH and eradicate the diseases that carry the soil requires the targeted materials.

Stainless steel is out – these 6 kitchen finishes are in it, designers say

Key points

  • Judges suggest that it ends like a matte black, glass or enamel for adding personality and heat.
  • Matte black skin spots, glass makes small kitchen feel bigger, and enamel brings Vintage charm.
  • People choose these alternatives for their unique look and practical perks such as endurance, easy maintenance or natural aging.

Tired of stainless steel devices? Don’t fret – there are a lot of other strong options for consideration when it comes to options for your kitchen.

Here, the two interior designers share six of their stainless steel alternatives, which they talk to their advantages, the kitchen styles that have best completed and what you need to know about the endurance of these materials.

Matt black

Credit:

Erin Williamson Design


For a smooth, modern look, say that Matt black, “delivers velvety, low glow, brings depth and contrast,” says Rebecah Murphy, co-founder and architect design in Murphy & Moore design.

Tehilla Bennett, the founder of Teela Bennett design, also appreciates matt black.

“It is a choice for the minimalist and attic of the kitchen because it makes such a strong visual statement,” she says.

Don’t assume that you decide to make a matte black appliances means that your kitchen will be super dark, though-murphy especially loves how this goal looks when it is paired with white cabinets or natural materials.

In terms of endurance, Matte Black is also a great choice, the designer adds. Although you can chip in high use, it does not show spots as easy as the stainless steel, Mirphy explains.

Do you want more design inspiration? Sign up for our free daily newsletter for the latest decorable ideas, design advice and more!

Matt white

At the other end of the spectrum is a matte white, which is not great, but instead looks soft and powdered, Bennett explains. The appearance complements a wide range of aesthetics, including scandinavian, minimalist, coastal or modern cuisine with rural houses, adds.

“People choose him when they want to softer and a lighter look that is placed in a cabineria or adds a calmer color contrast,” Bennett says.

Since the white-colored matte sometimes make from enamel, scratches and chips are the possibility of a bennett action. Matte White powder devices are more durable, although you should be careful when it comes to fat and sharp cleaners, adds.

Non-carted brass

Credit:

Design by Murphy & Moore / Photo Alise O’Brien


If you are fine with a material that develops a patina over time, the unkind messing is a great consideration option instead of stainless steel. Bennett explains that the material will darken and soften with age, and as such, it is an excellent complement in country houses and vintage style kitchens “, where the naturally, the time look feels.”

In terms of endurance over time, the unfinished brass was built to last, says Bennett. Again, she repeats that his patina is part of the charm material.

“Scratches or markings are not flaws, but part of the object change goals,” says the designer.

Polished nickel

Credit:

Design by Teela Bennett / Photo Caitlin Antje


If you long for a finer that is warmer in a stainless steel tone, see the polished nickel that Bennett describes as “almost a mirror in his brightness”.

When it comes to a great nickel in your home, the designer finds that the material looks beautiful in traditional or transitional cuisines, as well as glamorous spaces and likes to appear with marble or stone slabs.

“People choose a polished nickel when they want a look that feels richer and bigger than stainless steels,” she says. “Adds depth, improves light and brings a sophisticated feeling in the room.”

When a polished nickel has a finish of varnish, it is less likely to tart, Bennett stock. While it is that it is very durable material, keep in mind that polished nickel can easily show water spots and fingerprints.

“She needs a little more supportive to stay sparkling,” says the designer.

Glass front or great finish

If you really want to go fashion, you should opt for glass front or great finish.

“They are ideal for modern or high-tech cuisine and supplement other glossy surfaces such as polished stone,” Murphy says. “Reflecting and glamorous, they can also make smaller spaces to feel bigger.”

In terms of care, you don’t have to worry too much about spots and fingerprints when it comes to tempered glass. Just look after the avoidance of sharp influences, which can create chips, the designer explains.

Colored enamel ends

Credit:

@Houseofchais / instagram


Perhaps the maximist or colorful appearance is more of your vibe, in which it is very bothered by enamel, enamel processing are a great option for consideration. It’s a wonderful way to beautify your kitchen.

“Email adds warmth and character,” says Murphy. “Instead of interfere in the sea of ​​silver, provides individuality and charm.”

In general, colored enamel outlines are great in design, and colors like navy, green and red are popular choices, but they are neutrals and common. Try the look in your farmhouse, a cottage or classic European cuisine, Murphy suggests.

“They can also make a bold statement in modern designs in which the appliance becomes a focus,” she says.

Enamel is known to be held well, showing resistance to scratches and stains, and gives devices of furniture for Chernto, says Murphy.

Should hydrogen peroxide be used on their plants? We asked the gardeners

Key points

  • Hydrogen peroxide helps in the garden treatment mold, repairing tools, and even protection of seedlings.
  • It can distract pests such as the Gnjasa mushroom when they are diluted and applied to the ground.
  • Always work properly properly, first test on one sheet and use savings to avoid damage to soil microbes.

Sometimes, unexpected household items can be useful in the garden, such as platform peroxide. The most famous in what is for first aid, a chemical compound can also be used to deter pests and diseases in the garden.

“I like to keep a brown bottle of peroxide on the shelf in my garage with your other gardening stocks,” says Tabar Gifford, masterful gardener and a partnership cultivator on American meadows and high gardens. “It’s not a miracle medicine, but it’s one of these cheap, trusted tools I’ve learned to reach out when the plant needs a little extra help.”

So how do you best use this household to help your plants? We talked from two maternal mentions on how hydrogen peroxide can be used.

Why use hydrogen peroxide in the garden?

Experts say that the chemical compound can be used in the drill and pot cleaning, the treatment of powder molds, repairing sick plants, and even rescue overly.

Hydrogen peroxide is an antiseptic that can eliminate a lot of different bacteria, but to use it, you will first have to resolve it.

“Peroxide is just water with an additional oxygen molecule,” she says. “When it breaks down, it releases that oxygen, making conditions solid for fungal spores and harmful bacteria. This little oxygen-ruffal can even help breathe in breathing a little easier.”

Hydrogen peroxide can even help you can be sanitized and free the young seedlings of the disease, giving them a chance to grow, as Gifford experienced.

“Many years ago, I lost the entire tray of zine seedlings to mute the disease practically overnight,” she says. “Setling friends suggested that I have diariled my trays for seed diluted peroxide before transplantation, and I didn’t lose the tray since then.”

Want more darts tips? Sign up for our free kindergartens Bulletin for our best tips for breeding, troubleshooting and more!

More benefits for using a peroxide hydrogen in the garden

At the top are anti-bacterial, hydrogen peroxide can also be used to delay a pest – especially, Gnjatsa mushroom.

Dr. James S. Masterler, Founder of Pistix and Polen, dilutes the liquid and uses it on the upper layer of the infected soil plant.

He notes that this is not his “first line of defense” against mistakes, but he acts in a pinch.

“This helps kill Gnat Linjes in the soil without harming the plant,” he says. “Hydrogen peroxide is something that in your pest management tool and return from time to time – especially in low pressure infestations or when I need fast intervention.”

How to dilute hydrogen peroxide

To use hydrogen peroxide, Gifford says the trick gets the right dilution – and it can vary depending on what you use an antiseptic solution.

  • To release from mushrooms Gnati: The Mastaler dilutes one part three percent hydrogen peroxide to four parts of water for saturation of the upper layer of the soil.
  • To water the accentuated roots: Gifford suggests to mix two tablespoons of three percent hydrogen peroxide per quarter of water and pour him into the base of the plant.
  • For spraying infected sheets: Gifford recommends the use of one teaspoon per cup of water with falling soap to eat so that it helps hold.
  • To clean the gardening tools and drawers: Gifford uses a chemical unit in full force.

Before using the solution for the treatment of your plants, Gifford recommends that it test it on your plant to ensure that a strong substance does not harm.

“I always test splashing on one list, because some plants can be sensitive,” she says. “And I don’t use it as a regular treatment – just as needed – because exaggerated peroxide can disrupt useful microbes in the soil that plants depend.”